
Data-driver technological tree in Unreal Engine
In this post I would like to focus on use of Data-driven approach to implement and general technological tree which can be seen in every other game. I will use both C++ and blueprints.
Note that while this example may not look friendly at first I believe that its highly scalable and expandable.
What is Data-driven approach
Data-driven design is a way to setup your game logic. You can then change the behavior of your object by using different data rather than modifying the code itself. A great article on this topic can be found here.
Why to use DD
By designing you code this way you can enable your artists and designers to change gameplay aspects directly. They don’t have to touch any code or blueprint logic. This can speed up the whole development. Bear in mind that this approach is probably not suitable for every project. It can work well in real-time strategy game with a lot of resources. You can have one base building which is producing resources with the same logic. The only thing that changes is type of output resource and maybe a amount of the resource. This things are all “data” that can be modified.
Lets create technology tree
First we need to define and create some base classes for our tech tree.
We will need 3 things:
- Since we are using DD we will need to store out data in Tech Data asset
- Tech behavior class to use this data
- Tech manager class to have main logic and keep things centralized
Tech Data asset
We will create a subclass of UDataAsset and add some basic properties which defines our technology. We use separate structure so we can easily pass it as a parameter in our functions if we would need to but you can also add the properties directly to the UTechnologyAsset.
Notice the Instanced specifier. This will be important later on.
USTRUCT(BlueprintType)
struct FTechnologyInfo
{
	GENERATED_BODY()

	UPROPERTY(EditAnywhere, BlueprintReadWrite)
	FText Name;
// Resource cost (gold amount)
	UPROPERTY(EditAnywhere, BlueprintReadWrite)
	int32 Cost;
// Technologies that needs to be unlocked in order to unlock this
	UPROPERTY(EditAnywhere, BlueprintReadWrite)
	TArray<TObjectPtr<UTechnologyAsset>> ParentTechnology;

};

UCLASS(Blueprintable, BlueprintType)
class UTechnologyAsset : public UDataAsset
{
	GENERATED_BODY()

public:
    // The data about our technology
	UPROPERTY(EditAnywhere, BlueprintReadWrite)
	FTechnologyInfo TechInfo;

    // What should this technology do?
	UPROPERTY(EditAnywhere, BlueprintReadWrite, Instanced)
	TObjectPtr<UTechnologyBehaviour> Behaviour;
};
Tech tree behavior
Now lets define the base class for our behaviors. We will need only one method Activate which does something if the technology is… well… activated or “researched”. We will use a simple UObject as a base class because we basically don’t need anything else. We just need a place to store our logic and separate it from other component. Notice the DefaultToInstanced, EditInlineNew specifiers. They will be important later on.
We are passing
UTechManagerComponent*as a parameter becauseUObjectdoes not have helper methods to obtain player state/controller or actors in the world.
UCLASS(Blueprintable, BlueprintType, Abstract,
        DefaultToInstanced, EditInlineNew)
class UTechnologyBehaviour : public UObject
{
	GENERATED_BODY()

public:
	UFUNCTION(BlueprintNativeEvent, BlueprintCallable)
	void Activate(const UTechManagerComponent* TechnologyManager, const UTechnologyAsset* Asset);
};
Tech manager
The third part is a technology manager which will hold the current data. I use a UActorComponent subclass because I like to keep all my manager classes on a player state. This way I know that every manager is always valid. You can of course just use a simple AActor and place it into world. It keeps names of buildings that player can already build and map of modifiers that are relevant to player units. This data are read at runtime by other components. For example UI read which building can be build and sets relevant buttons. Units reads relevant modifiers and behave accordingly.
// Optional delegate to call when we activate new technology with 1 param - the activated technology
DECLARE_DYNAMIC_MULTICAST_DELEGATE_OneParam(FOnTechnologyActivated, UTechnologyAsset*, Activated);

UCLASS(Blueprintable)
class UTechManagerComponent : public UActorComponent
{
	GENERATED_BODY()

public:
	UTechManagerComponent();
// This function we will call as a main gate to activate technology
	UFUNCTION(BlueprintImplementableEvent, BlueprintCallable)
	void ActivateTechnology(const UTechnologyAsset* Technology);
// The delegate we can call after activation
	UPROPERTY(BlueprintAssignable, BlueprintCallable)
	FOnTechnologyActivated OnTechnologyActivated;
// Already active "researched" technologies
	UPROPERTY(EditDefaultsOnly, BlueprintReadWrite)
	TArray<TObjectPtr<UTechnologyAsset>> ActiveTechnologies;
// Array of building, that we can build
	UPROPERTY(EditDefaultsOnly, BlueprintReadWrite)
	TArray<FName> UnlockedBuildings;
// Array of modifiers we unlocked (Mining speed of workers, reload speed of tanks, ...)
    UPROPERTY(EditDefaultsOnly, BlueprintReadWrite)
	TMap<FName, float> TechModifiers;
};
Now that we have our base classes set up we can move on into the editor to use blueprints.
Create blueprint assets
Data assets
In the editor create technology by right clicking into the content browser and selecting Miscellaneous > Data Asset.

Then select our just created TechnologyAsset class.

You can now duplicate the created file to create another 3 technologies. Now fill the assets as follows.
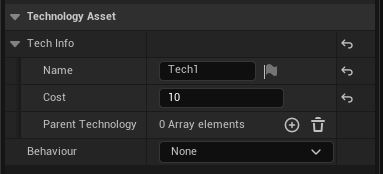

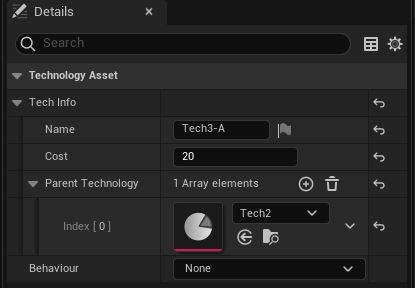
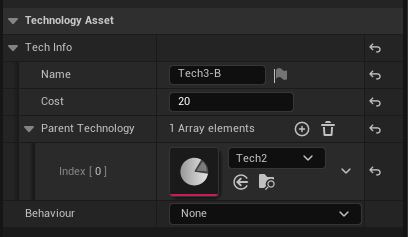
We are setting it in a way that Tech1 unlocks Tech2 which unlocks both Tech3-A and Tech3-B. We keep the behavior property empty because we will create them in the next step.
Behaviors
Create new blueprint class based on our TechnologyBehavior and name it BP_Behavior_Base.
Now open it and override the Activate function we declared in out C++ base class.

Because we will have multiple behavior which will share some common logic (spending resources in order to activate them) we want to contain this logic in a base class. We will add the spending resources logic into the BP_Behavior_Base class and let other logic for our child classes we will create in a minute. I have my resources saved on player state.

Now create 3 child blueprints of our BP_Behavior_Base blueprint. This will be our 3 different behaviors. Our folder should now looks as follows.

My idea of behaviors is the following:
- BP_Behavior_Print: Just a dummy behavior to prove the thing is working
- BP_Behavior_Building: This will unlock a new building to build
- BP_Behavior_Modifier: This will give us a better modifier (faster movement speed, bigger dmg, etc…)
Lets start with BP_Behavior_Print. This behavior is pretty simple. It just prints a message to get a feed back. Add it one The blueprint looks like follows.

It prints the technology name together with its own parameter. We also need to call the parent method so the resources are properly spend.
Instanced, DefaultToInstanced, EditInlineNew
Now we would like to add our new BP_Behavior_Print behavior to Tech1 but how to do that?
Remember these specifiers from earlier? They are useful exactly for this purpose. The Instanced property tells the engine (roughly my own interpretation) that this field will create its own instance of supplied class. The DefaultToInstanced, EditInlineNew marks the class that can be created this way. Now we can select our behavior from the editor in Tech1 data asset details. We can also set relevant variables right in the data asset.

Now we can create the other two behaviors.
BP_Behavior_Building

We simply add new building names into the unlocked buildings array in our Technology manager.
BP_Behavior_Modifier

We add the specified modifiers to their matching map entries in Technology manager.
And set them in appropriate technology assets.

The first two are unlocking new buildings. The last one is improving reload and movement speed of our units by 0.2 and 0.5 respectively.
Technology manager
Create another blueprint class. This time a child of our UTechManagerComponent class. In this blueprint we need to implement the ActivateTechnology function. It should look like this.

It first calls Activate function on obtained behavior and then it just adds the technology into its own array (so UI knows it can’t be activated again). In the end it calls OnTechnologyActivated delegate. As we can see all logic is passed to the created behaviors. This way it is highly scalable and expandable with another behaviors. Do we need to research another building? Simply add another Technology data asset. New modifier? Again create new asset. Do we need something completely different? Just create a new behavior with correct parameters and it can be reused with all different types of relevant data.
UI
Now we need to create some UI so we can interact with our new classes.
Technology button
Create a new User Widget subclass in blueprint called WBP_TechItemButton which will represents one technology. Now add a button and text inside. Don’t forget to check IsVariable on the Text widget in the upper right corner.

Add the TechnologyAsset variable so the widget knows which technology it represents and add some logic in the PreConstruct method so we can see changes in the editor. Don’t forget to mark the variable as public. We are just setting the text to show the name and cost.

Next we need to define the unlocking logic itself. We need our button to be enabled only when the technology can be activated. We write this in the Construct method. We obtain the TechManager which I have saved on the player state. Bind custom event to “OnTechnologyActivated” delegate and then manually call the function which we just bind.

In the created event we need to check two things. We need to know if this technology is already active and if so we disable the button. If it is not active yet we check if the corresponding parents are active and if not we again disable this button.


And finally we create a event to call when the button itself is clicked on. We simply get TechManager reference and call ActivateTechnology function.

Now lets create a container which will hold these buttons.
Technology tree
Create a new User Widget blueprint called WBP_TechTree and add an overlay to it. Next add 4 WBP_TechButtons (we have only 4 technologies) inside an horizontal box and add some padding so we have some nice spacing present. Assign each button a technology and compile and we will see a change in appearance because we used the PreConstruct method.

Showing the widgets
The last thing we need to do is to actually show the widget on screen. So lets create a last blueprint class BP_HUD which derives from the HUD class. In the BeginPlay method we just create our tech tree widget and add it to the screen.

Now lets set this HUD to be used by our game mode. Don’t mind the other classes I have in my game mode. They are not needed. Just select the class you just created.

Lets test it!!!
Lets try what we just created and hit play. All technologies but the first one are locked. Because the first one does not have any parent.

After clicking the tech button we see that our print behavior prints a custom message and unlocks the next technology.

Clicking Tech2 does its own behavior which unlocks buildings and also unlocks the next two techs. I have added some prints so we can see its actually doing the behavior.

The last two also works.


Conclusion
So we can build our own technological tree. Where to go next? You can try to add mutual excluding technologies. Or thing up another different behavior the technologies can go. But keep in mind that in order to let thing be modular and expandable you need to setup the behavior in a way that it is based on its parameters AKA. Data-driven. Or don’t ¯\(ツ)/¯. In the end it’s up to you ;).